FormCollection
To run your SQL code, follow these steps:
- Copy the ready-made SQL code you have.
- Open SQL Server Management Studio (SSMS) or your SQL tool.
- Connect to your database server.
- Click on New Query.
- Paste the copied SQL code into the query window.
- Click Execute (or press F5) to run the query.
Simple:
Copy SQL → Open SSMS → New Query → Paste → Execute.
-- Create Database
CREATE DATABASE MVC_FormCollection
GO

-- Use Database
USE MVC_FormCollection
GO

-- Create Student Table
CREATE TABLE Student
(
    StudentId INT PRIMARY KEY IDENTITY(1,1),
    Name NVARCHAR(50) NOT NULL,
    Age INT NOT NULL,
    Gender NVARCHAR(10) NOT NULL,
    Course NVARCHAR(50) NOT NULL,
    Marks INT NOT NULL
)
GO

-- Insert Default Data
INSERT INTO Student
(Name, Age, Gender, Course, Marks)
VALUES
('Ali', 20, 'Male', 'BCA', 85),
('Sara', 22, 'Female', 'BBA', 90),
('Ahmed', 21, 'Male', 'BSc IT', 78),
('Fatima', 23, 'Female', 'MBA', 88),
('Khushbu', 20, 'Female', 'BSC', 99)
GO

-- Create Stored Procedure

CREATE PROCEDURE spAddStudent
    @Name NVARCHAR(50),
    @Age INT,
    @Gender NVARCHAR(10),
    @Course NVARCHAR(50),
    @Marks INT

AS
BEGIN
    INSERT INTO Student
        (Name, Age, Gender, Course, Marks)
    VALUES
        (@Name, @Age, @Gender, @Course, @Marks)
END
GO
Steps After Creating a New ASP.NET MVC Project
After opening Visual Studio 2022, click Create a new project.
- Choose ASP.NET Web App (Model-View-Controller) and language C#.
- Click Next, Visual Studio will configure the project.
- Enter the Project Name and Project Location.
- Select the .NET Framework Version you need.
- Click Create to create the project.
Select Empty Template
- Tick the MVC option to add Model, View, and Controller folders along with core references.
- Click Create again to finalize the project.
Project Created Successfully:
Now, to add the database model: Right-click on your Project Name → Add → New Item → Select Data → ADO.NET Entity Data Model → Click Add.
Create Business Layer Class
Now, create a class inside the Models folder.
Go to the Models folder 📁, right-click on it, and select Add → Class.
Name the class StudentBusinessLayer and click Add.
After creating the class, open StudentBusinessLayer.cs and update it with the code provided below.
using System;
using System.Collections.Generic;
using System.Configuration;
using System.Data;
using System.Data.SqlClient;
using System.Linq;
using System.Web;

namespace Your_Project_Name.Models
{
    public class StudentBusinessLayer
    {
        public void AddStudent(Student student)
        {
            string connectionString = ConfigurationManager.ConnectionStrings["DBCS"].ConnectionString;

            using (SqlConnection con = new SqlConnection(connectionString))
            {
                SqlCommand cmd = new SqlCommand("spAddStudent", con)
                {
                    CommandType = CommandType.StoredProcedure
                };

                SqlParameter paramName = new SqlParameter
                {
                    ParameterName = "@Name", Value = student.Name
                };
                cmd.Parameters.Add(paramName);

                SqlParameter paramAge = new SqlParameter
                {
                    ParameterName = "@Age", Value = student.Age
                };
                cmd.Parameters.Add(paramAge);

                SqlParameter paramGender = new SqlParameter
                {
                    ParameterName = "@Gender", Value = student.Gender
                };
                cmd.Parameters.Add(paramGender);

                SqlParameter paramCourse = new SqlParameter
                {
                    ParameterName = "@Course", Value = student.Course
                };
                cmd.Parameters.Add(paramCourse);

                SqlParameter paramMarks = new SqlParameter
                {
                    ParameterName = "@Marks", Value = student.Marks
                };
                cmd.Parameters.Add(paramMarks);

                con.Open();
                cmd.ExecuteNonQuery();
            }
        }
    }
}
Create Student Controller
Go to the Controllers folder 📁, right-click on it, and select Add → Controller.
Choose MVC 5 Controller – Empty and click Add.
Name the controller StudentController and click Add.
After creating the controller, open StudentController.cs .
using System;
using System.Collections.Generic;
using System.Linq;
using System.Web;
using System.Web.Mvc;
using Your_Project_Name.Models;

namespace Your_Project_Name.Controllers
{
    public class StudentController : Controller
    {
        public ActionResult Index()
        {
            MVC_FormCollectionEntities dbContext = new MVC_FormCollectionEntities();

            List<Student> StuList = dbContext.Students.ToList();

            return View(StuList);
        }

        [HttpGet]
        public ActionResult Create()
        {
            return View();
        }

        [HttpPost]
        public ActionResult Create(FormCollection formCollection)
        {
            Student student = new Student();

            student.Name = formCollection["Name"];
            student.Age = Convert.ToInt32(formCollection["Age"]);
            student.Gender = formCollection["Gender"];
            student.Course = formCollection["Course"];
            student.Marks = Convert.ToInt32(formCollection["Marks"]);

            StudentBusinessLayer studentBusinessLayer = new StudentBusinessLayer();

            studentBusinessLayer.AddStudent(student);

            return RedirectToAction("Index");
        }
    }
}
Create Index View
Now open StudentController.
Right-click on the Index action method → Select Add View.
Choose MVC 5 View.
Configure the Add View options:
- View Name: Index
- Template: List
- Model Class: Student (Your_Project_Name)
- Data Context Class: MVC_FormCollectionEntities (Your_Project_Name)
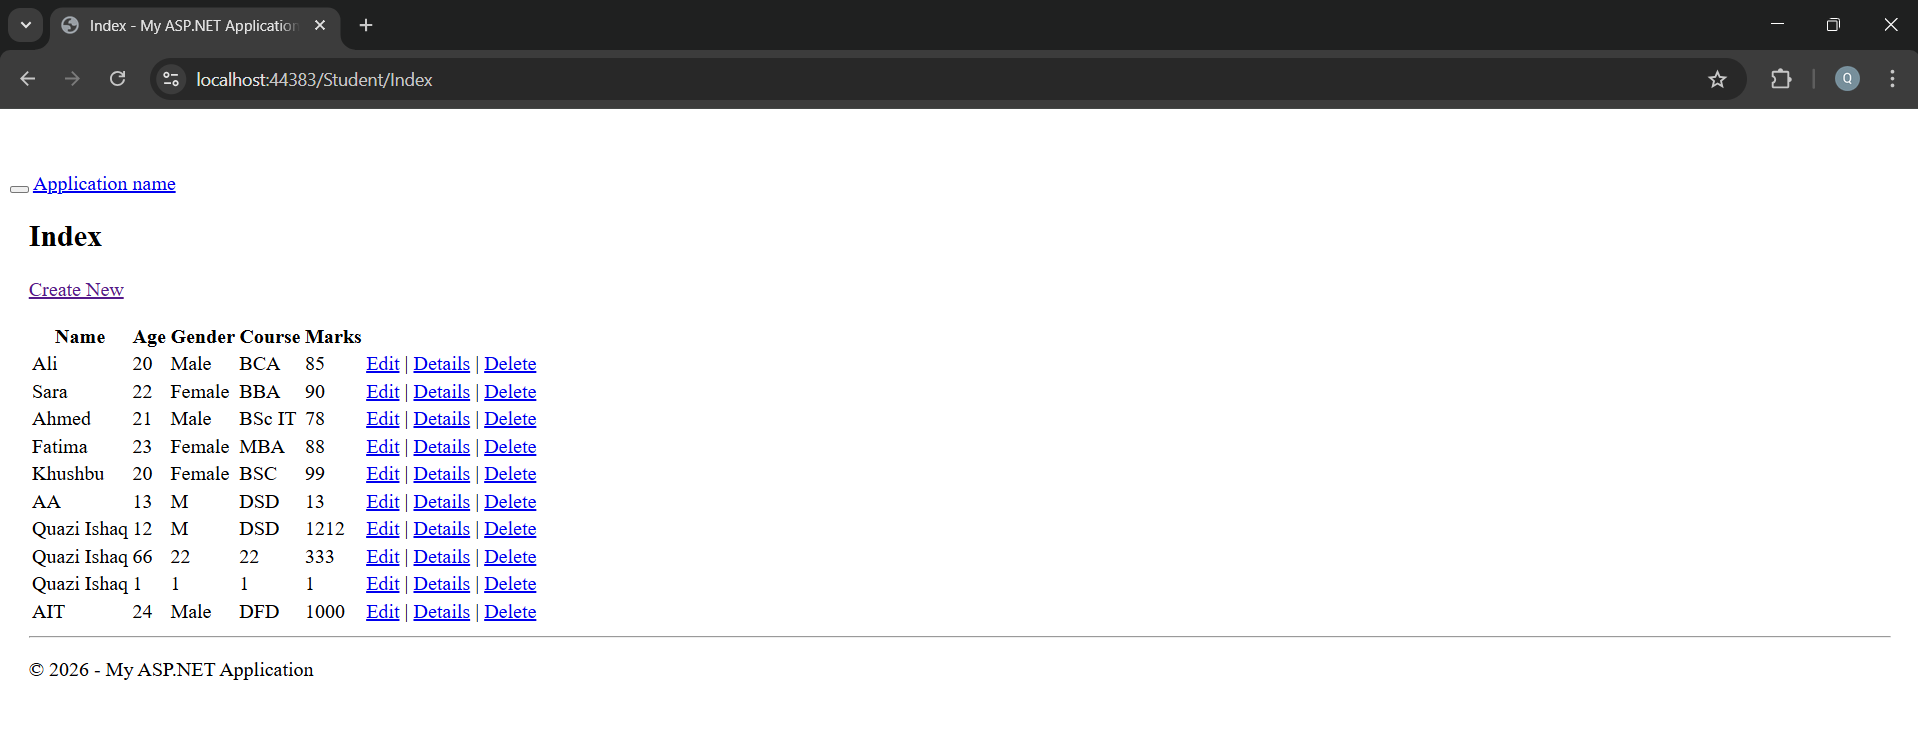
@model IEnumerable<Your_Project_Name.Student>

@{
    ViewBag.Title = "Index";
}

<h2>Student List</h2>

<p>
    @Html.ActionLink("Create New", "Create")
</p>

<table class="table">

    <tr>
        <th>@Html.DisplayNameFor(model => model.Name)</th>
        <th>@Html.DisplayNameFor(model => model.Age)</th>
        <th>@Html.DisplayNameFor(model => model.Gender)</th>
        <th>@Html.DisplayNameFor(model => model.Course)</th>
        <th>@Html.DisplayNameFor(model => model.Marks)</th>
        <th></th>
    </tr>

@foreach (var item in Model) {
    <tr>
        <td>@Html.DisplayFor(modelItem => item.Name)</td>
        <td>@Html.DisplayFor(modelItem => item.Age)</td>
        <td>@Html.DisplayFor(modelItem => item.Gender)</td>
        <td>@Html.DisplayFor(modelItem => item.Course)</td>
        <td>@Html.DisplayFor(modelItem => item.Marks)</td>
        <td>
            @Html.ActionLink("Edit", "Edit", new { id = item.StudentId }) |
            @Html.ActionLink("Details", "Details", new { id = item.StudentId }) |
            @Html.ActionLink("Delete", "Delete", new { id = item.StudentId })
        </td>
    </tr>
}

</table>
Create View for Student
Now open StudentController.
Right-click on the Details action method → Select Add View.
Choose MVC 5 View.
Configure the Add View options carefully:
- View Name: Create
- Template: Create
- Model Class: Student (Your_Project_Name)
- Data Context Class: MVC_ActionLinkEntities (Your_Project_Name)
Then click the Add button.
Visual Studio will automatically generate the Create.cshtml file.
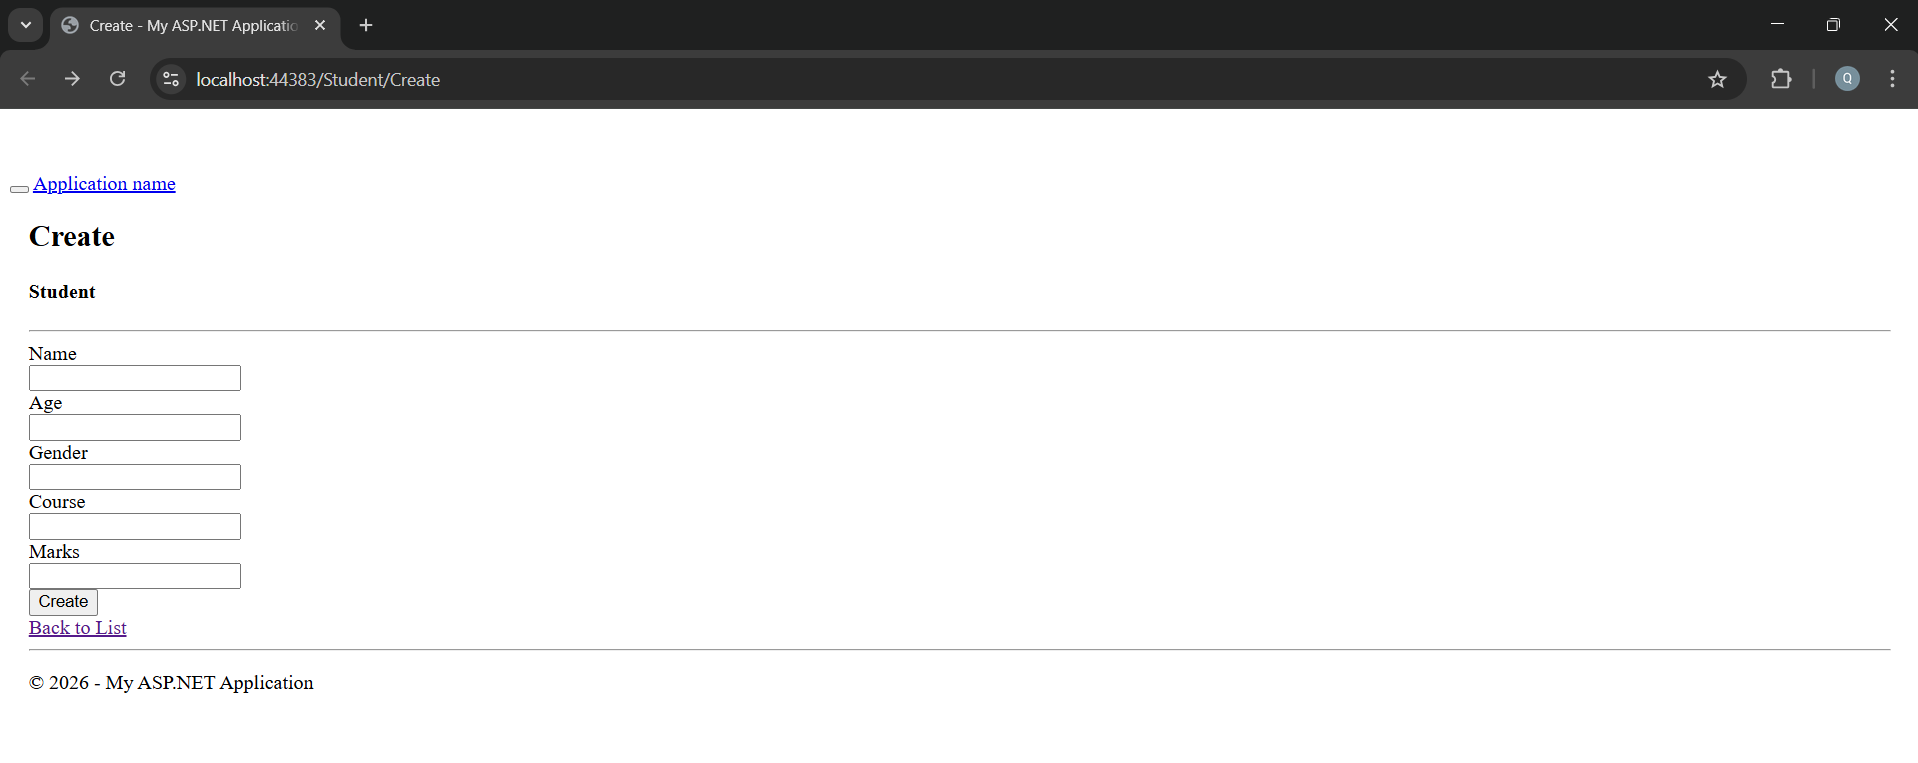
@model Your_Project_Name.Student

@{
    ViewBag.Title = "Create";
}

<h2>Create</h2>

@using (Html.BeginForm())
{
    @Html.AntiForgeryToken()

    <div class="form-horizontal">

        <h4>Student</h4>
        <hr />

        @Html.ValidationSummary(true, "", new { @class = "text-danger" })

        <div class="form-group">
            @Html.LabelFor(model => model.Name, new { @class = "control-label col-md-2" })
            <div class="col-md-10">
                @Html.EditorFor(model => model.Name, new { htmlAttributes = new { @class = "form-control" } })
                @Html.ValidationMessageFor(model => model.Name, "", new { @class = "text-danger" })
            </div>
        </div>

        <div class="form-group">
            @Html.LabelFor(model => model.Age, new { @class = "control-label col-md-2" })
            <div class="col-md-10">
                @Html.EditorFor(model => model.Age, new { htmlAttributes = new { @class = "form-control" } })
                @Html.ValidationMessageFor(model => model.Age, "", new { @class = "text-danger" })
            </div>
        </div>

        <div class="form-group">
            @Html.LabelFor(model => model.Gender, new { @class = "control-label col-md-2" })
            <div class="col-md-10">
                @Html.EditorFor(model => model.Gender, new { htmlAttributes = new { @class = "form-control" } })
                @Html.ValidationMessageFor(model => model.Gender, "", new { @class = "text-danger" })
            </div>
        </div>

        <div class="form-group">
            @Html.LabelFor(model => model.Course, new { @class = "control-label col-md-2" })
            <div class="col-md-10">
                @Html.EditorFor(model => model.Course, new { htmlAttributes = new { @class = "form-control" } })
                @Html.ValidationMessageFor(model => model.Course, "", new { @class = "text-danger" })
            </div>
        </div>

        <div class="form-group">
            @Html.LabelFor(model => model.Marks, new { @class = "control-label col-md-2" })
            <div class="col-md-10">
                @Html.EditorFor(model => model.Marks, new { htmlAttributes = new { @class = "form-control" } })
                @Html.ValidationMessageFor(model => model.Marks, "", new { @class = "text-danger" })
            </div>
        </div>

        <div class="form-group">
            <div class="col-md-offset-2 col-md-10">
                <input type="submit" value="Create" class="btn btn-default" />
            </div>
        </div>

    </div>
}

<div>
    @Html.ActionLink("Back to List", "Index")
</div>

<script src="~/Scripts/jquery-1.10.2.min.js"></script>
<script src="~/Scripts/jquery.validate.min.js"></script>
<script src="~/Scripts/jquery.validate.unobtrusive.min.js"></script>
Update RouteConfig.cs
Open the RouteConfig.cs file.
By default, the route is set to:
defaults: new { controller = "Home", action = "Index", id = UrlParameter.Optional }
I have changed "Home" to "Student".
Now the updated code will be:
defaults: new { controller = "Student", action = "Create", id = UrlParameter.Optional }
Important:
When you run the project, it will directly open the Student Controller instead of the Home Controller.
using System;
using System.Collections.Generic;
using System.Linq;
using System.Web;
using System.Web.Mvc;
using System.Web.Routing;

namespace Your_Project_Name
{
    public class RouteConfig
    {
        public static void RegisterRoutes(RouteCollection routes)
        {
            routes.IgnoreRoute("{resource}.axd/{*pathInfo}");

            routes.MapRoute(
                name: "Default",
                url: "{controller}/{action}/{id}",
                defaults: new
                {
                    controller = "Student",action = "Create",id = UrlParameter.Optional
                }
            );
        }
    }
}
Output
Application URL
https://localhost:44369/Student/Create
Application URL
https://localhost:44369/Student/Index