Business Objects as Model in ASP.NET MVC
In ASP.NET MVC, the Model represents the application's data and business logic. Instead of placing data logic directly inside Controllers, we create separate Business Object classes that act as Models.
What are Business Objects?
Business Objects are simple C# classes that contain:
- Properties (Data)
- Business Rules (if required)
- Validation Logic
These classes represent real-world entities like Employee, Department, Student, etc.
Why Use Business Objects as Model?
- Clean and organized project structure
- Separation of Concerns (MVC principle)
- Easy maintenance and scalability
- Reusability of business logic
How It Works in MVC
- The Model (Business Object) holds the data.
- The Controller interacts with the Model.
- The View displays the Model data.
This approach keeps the Controller lightweight and makes the application more structured and professional.
Run the SQL Script
Below, the SQL script is provided.
Important Instructions:
- Open SQL Server Management Studio (SSMS).
- Connect to your SQL Server.
- Click on New Query.
- Copy the complete SQL code given below.
- Paste it into the New Query window.
- Click Execute (or press F5).
After running the script, the Database, Tables, and Sample Data will be created automatically.
That’s it — everything will be ready for use in your MVC project.
CREATE DATABASE MVC_Business_Objects;
GO

USE MVC_Business_Objects;
GO

-- Create Employee Table
CREATE TABLE Employee
(
    Id INT PRIMARY KEY IDENTITY(1,1),
    Name NVARCHAR(50),
    Gender NVARCHAR(10),
    City NVARCHAR(50),
    Salary DECIMAL(18,2),
    DateOfBirth DATETIME
);
GO

-- Insert test data into Employee table
INSERT INTO Employee (Name, Gender, City, Salary, DateOfBirth)
VALUES
('Khushbu',  'Female', 'Aurangabad', 10000, '1995-06-15'),
('Ayaan',    'Male',   'Hyderabad', 5000, '1992-04-10'),
('Sara',     'Female', 'Bangalore', 4500, '1994-01-22'),
('Zaid',     'Male',   'Delhi', 6000, '1991-08-18'),
('Fatima',   'Female', 'Pune', 5500, '1993-03-05'),
('Rehan',    'Male',   'Chennai', 4800, '1990-11-12'),
('Iqra',     'Female', 'Kolkata', 5200, '1996-09-09'),
('Arman',    'Male',   'Jaipur', 4700, '1992-07-14'),
('Hiba',     'Female', 'Lucknow', 5100, '1994-12-30');
GO

-- Stored Procedure to retrieve all employees
CREATE PROCEDURE spGetAllEmployees
AS
BEGIN
    SELECT Id, Name, Gender, City, Salary, DateOfBirth
    FROM Employee;
END;
GO
Step 1: Create New Project
- Open Visual Studio
- Click Create New Project
- Select ASP.NET Web Application (MVC)
- Click Create
Step 2: Connect Database
- Right Click on Project Name
- Select Add → New Item
- Choose Data
- Select ADO.NET Entity Data Model
- Click Add
- Connect to your Database
- Select required Tables
- Click Finish
After this, Model Classes and DbContext will be AUTO-GENERATED.
Create Business Layer Class
Now, create a class inside the Models folder.
Go to the Models folder 📁, right-click on it, and select Add → Class.
Name the class EmployeeBusinessLayer and click Add.
After creating the class, open EmployeeBusinessLayer.cs and update it with the code provided below.
using System;
using System.Collections.Generic;
using System.Configuration;
using System.Data;
using System.Data.SqlClient;
using System.Linq;
using System.Web;

namespace Your_Project_Name.Models
{
    public class EmployeeBusinessLayer
    {
        public List<Employee> GetAllEmployess()
        {
            string connectionString = ConfigurationManager.ConnectionStrings["DBCS"].ConnectionString;

            List<Employee> employees = new List<Employee>();

            using (SqlConnection con = new SqlConnection(connectionString))
            {
                SqlCommand cmd = new SqlCommand("spGetAllEmployees", con);

                cmd.CommandType = CommandType.StoredProcedure;

                con.Open();

                SqlDataReader rdr = cmd.ExecuteReader();

                while (rdr.Read())
                {
                    Employee employee = new Employee();

                    employee.Id = Convert.ToInt32(rdr["Id"]);
                    employee.Name = rdr["Name"].ToString();
                    employee.Gender = rdr["Gender"].ToString();
                    employee.City = rdr["City"].ToString();
                    employee.Salary = Convert.ToDecimal(rdr["Salary"]);
                    employee.DateOfBirth = Convert.ToDateTime(rdr["DateOfBirth"]);

                    employees.Add(employee);
                }
            }
            return employees;
        }
    }
}
Web.config
<?xml version="1.0" encoding="utf-8"?>

<configuration>

  <configSections>
    <!-- Entity Framework Configuration -->
    <section
        name="entityFramework"
        type="System.Data.Entity.Internal.ConfigFile.EntityFrameworkSection, EntityFramework"
        requirePermission="false" />
  </configSections>

  <appSettings>
    <add key="webpages:Version" value="3.0.0.0" />
    <add key="webpages:Enabled" value="false" />
    <add key="ClientValidationEnabled" value="true" />
    <add key="UnobtrusiveJavaScriptEnabled" value="true" />
  </appSettings>

  <system.web>
    <compilation debug="true" targetFramework="4.7.2" />
    <httpRuntime targetFramework="4.7.2" />
  </system.web>

  <connectionStrings>

    <add name="MVC_Business_ObjectsEntities"
        connectionString="metadata=...;initial catalog=MVC_Business_Objects;integrated security=True"
        providerName="System.Data.EntityClient" />

    <add name="DBCS"
        connectionString="Data Source=.\SQLEXPRESS;Initial Catalog=MVC_Business_Objects;Integrated Security=True"
        providerName="System.Data.SqlClient" />

  </connectionStrings>

</configuration>
ConnectionStrings Copy And Paste Web.config File
<add name="DBCS"
connectionString="Data Source=.\SQLEXPRESS;Initial Catalog=MVC_Business_Objects;Integrated Security=True"
providerName="System.Data.SqlClient" />
Create Employee Controller
Now, go to the Controllers folder 📁.
Right-click on Controllers → Select Add → Controller.
Choose MVC 5 Controller – Empty and click Add.
Name the controller EmployeeController and click Add.
After creating the controller, open EmployeeController.cs .
using System;
using System.Collections.Generic;
using System.Linq;
using System.Web;
using System.Web.Mvc;
using WebApplication6.Models;

namespace Your_Project_Name.Controllers
{
    public class EmployeeController : Controller
    {
        public ActionResult Index()
        {
            EmployeeBusinessLayer employeeBusinessLayer = new EmployeeBusinessLayer();

            List<Employee> employees = employeeBusinessLayer.GetAllEmployess();

            return View(employees);
        }
    }
}
Create Index View for Employee
Now open EmployeeController.
Right-click on the Index action method → Select Add View.
Choose MVC 5 View.
Configure the Add View options:
- View Name: Index
- Template: List
- Model Class: Employee (WebApplication6)
- Data Context Class: MVC_Business_ObjectsEntities (WebApplication6)
Then click the Add button.
The List View will be generated automatically.
@model IEnumerable<Your_Project_Name.Employee>

@{
    ViewBag.Title = "Index";
}

<h2>Index</h2>

<p>
    @Html.ActionLink("Create New", "Create")
</p>

<table class="table">
    <tr>
        <th>
            @Html.DisplayNameFor(model => model.Name)
        </th>
        <th>
            @Html.DisplayNameFor(model => model.Gender)
        </th>
        <th>
            @Html.DisplayNameFor(model => model.City)
        </th>
        <th>
            @Html.DisplayNameFor(model => model.Salary)
        </th>
        <th>
            @Html.DisplayNameFor(model => model.DateOfBirth)
        </th>
        <th></th>
    </tr>

@foreach (var item in Model)
{
    <tr>
        <td>
            @Html.DisplayFor(modelItem => item.Name)
        </td>
        <td>
            @Html.DisplayFor(modelItem => item.Gender)
        </td>
        <td>
            @Html.DisplayFor(modelItem => item.City)
        </td>
        <td>
            @Html.DisplayFor(modelItem => item.Salary)
        </td>
        <td>
            @Html.DisplayFor(modelItem => item.DateOfBirth)
        </td>
        <td>
            @Html.ActionLink("Edit", "Edit", new { id = item.Id }) |
            @Html.ActionLink("Details", "Details", new { id = item.Id }) |
            @Html.ActionLink("Delete", "Delete", new { id = item.Id })
        </td>
    </tr>
}

</table>
Update RouteConfig.cs
Open the RouteConfig.cs file.
By default, the route is set to:
defaults: new { controller = "Home", action = "Index", id = UrlParameter.Optional }
I have changed "Home" to "Employee".
Now the updated code will be:
defaults: new { controller = "Employee", action = "Index", id = UrlParameter.Optional }
Important:
When you run the project, it will directly open the Employee Controller instead of the Home Controller.
using System;
using System.Collections.Generic;
using System.Linq;
using System.Web;
using System.Web.Mvc;
using System.Web.Routing;

namespace Your_Project_Name
{
    public class RouteConfig
    {
        public static void RegisterRoutes(RouteCollection routes)
        {
            routes.IgnoreRoute("{resource}.axd/{*pathInfo}");

            routes.MapRoute(
                name: "Default",
                url: "{controller}/{action}/{id}",
                defaults: new
                {
                    controller = "Employee",action = "Index",id = UrlParameter.Optional
                }
            );
        }
    }
}
Output
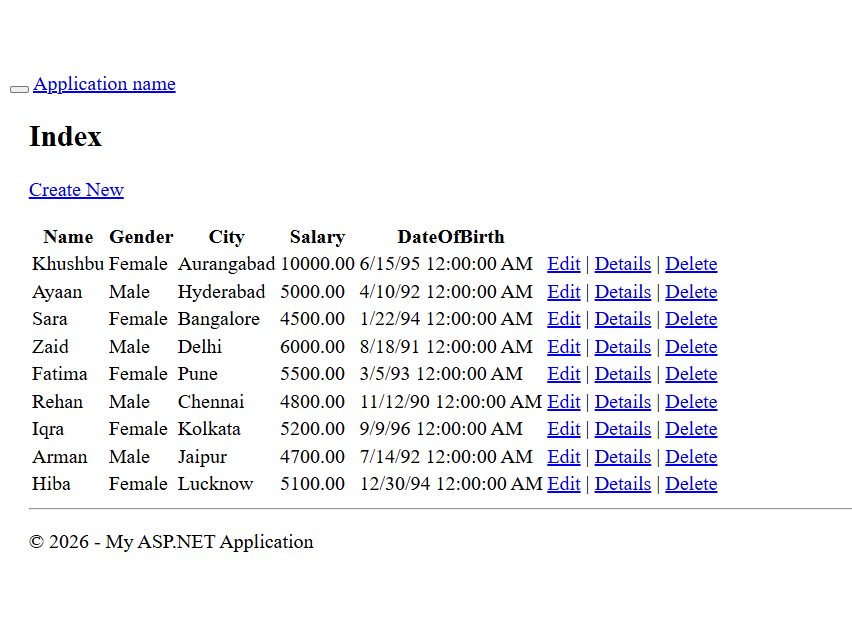
Application URL
https://localhost:44369/Employee/Index