TextBox Helper in ASP.NET MVC
What is TextBox Helper?
TextBox Helper is used to create a text input field in Razor View.
It generates this HTML:
Create Employee Model (With Address Field)
In this example, we are using the version that includes the Address field.
First, go to the Models folder 📁.
Right-click on Models → Select Add → Class.
Name the class Employee and click Add.
using System;
using System.Collections.Generic;
using System.ComponentModel.DataAnnotations;
using System.Linq;
using System.Web;

namespace Your_Project_Name.Models
{
    public class Employee
    {
        public int EmployeeId { get; set; }

        [Display(Name = "Name")]
        public string EmployeeName { get; set; }

        public string Password { get; set; }

        public string Gender { get; set; }

        public string City { get; set; }

        public Nullable<decimal> Salary { get; set; }

        public string Address { get; set; }
    }
}
Create Employee Controller
Go to the Controllers folder 📁, right-click on it, and select Add → Controller.
Choose MVC 5 Controller – Empty and click Add.
Name the controller EmployeeController and click Add.
After creating the controller, open EmployeeController.cs .
using System;
using System.Collections.Generic;
using System.Linq;
using System.Web;
using System.Web.Mvc;
using WebApplication11.Models;

namespace WebApplication11.Controllers
{
    public class EmployeeController : Controller
    {
        // GET: Employee
        public ActionResult Index()
        {
            Employee emp = new Employee()
            {
                EmployeeId = 1,
                Address = "Rehmaniya colony, Aurangabad, 431001, Maharashtra, India"
            };

            return View(emp);
        }
    }
}
Create Index View
Now open StudentController.
Right-click on the Index action method → Select Add View.
Choose MVC 5 View.
Configure the Add View options:
- View Name: Index
- Template: Create
- Model Class: Employee (Your_Project_Name.Models)
Visual Studio will automatically generate the Create.cshtml file.
@model WebApplication11.Models.Employee

@{
    ViewBag.Title = "Index";
}

<h2>Index</h2>

@using (Html.BeginForm())
{
    @Html.AntiForgeryToken()

    <div class="form-horizontal">
        <h4>Employee</h4>
        <hr />

        @Html.ValidationSummary(true, "", new { @class = "text-danger" })

        <div class="form-group">
            @Html.LabelFor(model => model.EmployeeName, new { @class = "control-label col-md-2" })
            <div class="col-md-10">
                @Html.EditorFor(model => model.EmployeeName, new { htmlAttributes = new { @class = "form-control" } })
                @Html.ValidationMessageFor(model => model.EmployeeName, "", new { @class = "text-danger" })
            </div>
        </div>

        <div class="form-group">
            @Html.LabelFor(model => model.Password, new { @class = "control-label col-md-2" })
            <div class="col-md-10">
                @Html.EditorFor(model => model.Password, new { htmlAttributes = new { @class = "form-control" } })
                @Html.ValidationMessageFor(model => model.Password, "", new { @class = "text-danger" })
            </div>
        </div>

        <div class="form-group">
            @Html.LabelFor(model => model.Gender, new { @class = "control-label col-md-2" })
            <div class="col-md-10">
                @Html.EditorFor(model => model.Gender, new { htmlAttributes = new { @class = "form-control" } })
                @Html.ValidationMessageFor(model => model.Gender, "", new { @class = "text-danger" })
            </div>
        </div>

        <div class="form-group">
            @Html.LabelFor(model => model.City, new { @class = "control-label col-md-2" })
            <div class="col-md-10">
                @Html.EditorFor(model => model.City, new { htmlAttributes = new { @class = "form-control" } })
                @Html.ValidationMessageFor(model => model.City, "", new { @class = "text-danger" })
            </div>
        </div>

        <div class="form-group">
            @Html.LabelFor(model => model.Salary, new { @class = "control-label col-md-2" })
            <div class="col-md-10">
                @Html.EditorFor(model => model.Salary, new { htmlAttributes = new { @class = "form-control" } })
                @Html.ValidationMessageFor(model => model.Salary, "", new { @class = "text-danger" })
            </div>
        </div>

        <div class="form-group">
            @Html.LabelFor(model => model.Address, new { @class = "control-label col-md-2" })
            <div class="col-md-10">
                @Html.EditorFor(model => model.Address, new { htmlAttributes = new { @class = "form-control" } })
                @Html.ValidationMessageFor(model => model.Address, "", new { @class = "text-danger" })
            </div>
        </div>

        <div class="form-group">
            <div class="col-md-offset-2 col-md-10">
                <input type="submit" value="Create" class="btn btn-default" />
            </div>
        </div>

    </div>
}

<div>
    @Html.ActionLink("Back to List", "Index")
</div>

<script src="~/Scripts/jquery-1.10.2.min.js"></script>
<script src="~/Scripts/jquery.validate.min.js"></script>
<script src="~/Scripts/jquery.validate.unobtrusive.min.js"></script>
Old Address Field Code
<div class="form-group">
            @Html.LabelFor(model => model.Address, new { @class = "control-label col-md-2" })
            <div class="col-md-10">
                @Html.EditorFor(model => model.Address, new { htmlAttributes = new { @class = "form-control" } })
                @Html.ValidationMessageFor(model => model.Address, "", new { @class = "text-danger" })
            </div>
</div>
Update Address Field Code
<div class="form-group">
    @Html.LabelFor(model => model.Address,htmlAttributes: new { @class = "control-label col-md-2" })
    <div class="col-md-10">
        @Html.TextArea("Address", null, new { @class = "form - control" })
        @Html.ValidationMessageFor(model => model.Address, "", new { @class = "text-danger" })
    </div>
</div>
Update RouteConfig.cs
Open the RouteConfig.cs file.
By default, the route is set to:
defaults: new { controller = "Home", action = "Index", id = UrlParameter.Optional }
I have changed "Home" to "Employee".
Now the updated code will be:
defaults: new { controller = "Employee", action = "Index", id = UrlParameter.Optional }
Important:
When you run the project, it will directly open the Employee Controller instead of the Home Controller.
using System;
using System.Collections.Generic;
using System.Linq;
using System.Web;
using System.Web.Mvc;
using System.Web.Routing;

namespace Your_Project_Name
{
    public class RouteConfig
    {
        public static void RegisterRoutes(RouteCollection routes)
        {
            routes.IgnoreRoute("{resource}.axd/{*pathInfo}");

            routes.MapRoute(
                name: "Default",
                url: "{controller}/{action}/{id}",
                defaults: new
                {
                    controller = "Employee",action = "Index",id = UrlParameter.Optional
                }
            );
        }
    }
}
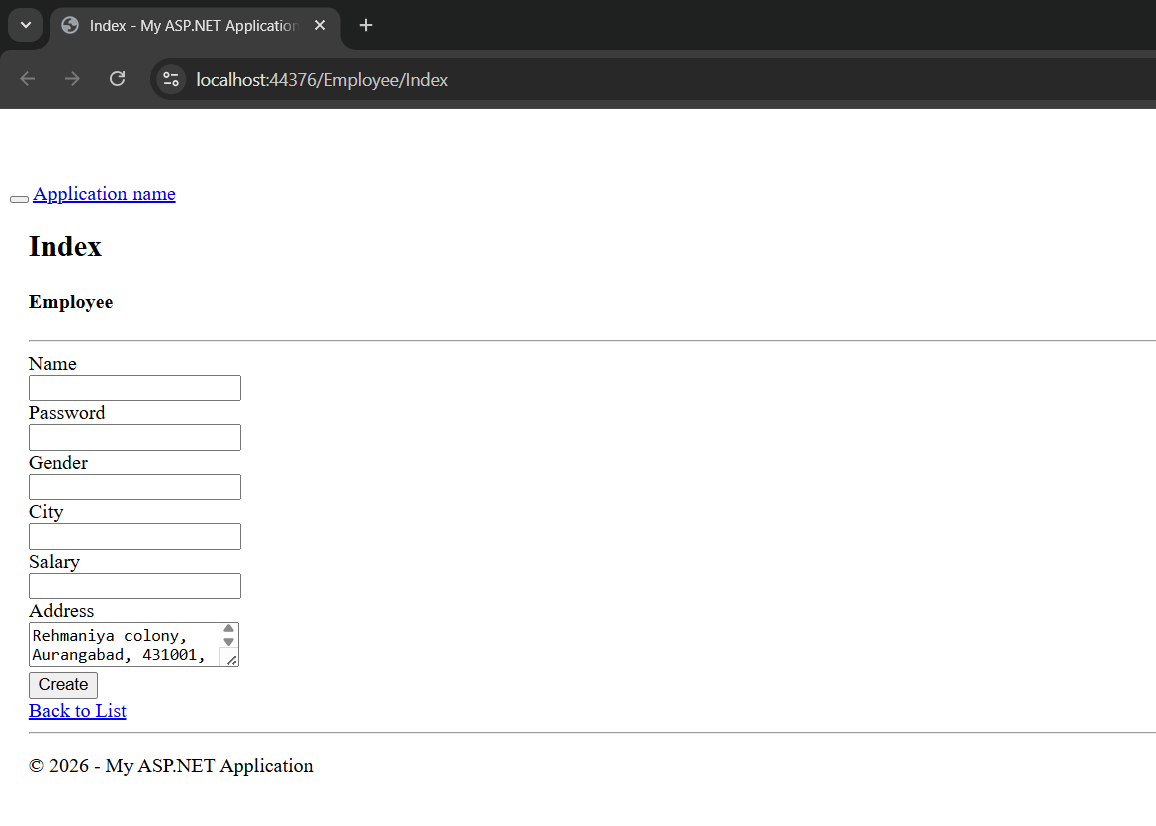
Output
Application URL
https://localhost:44376/Employee/Index