FormCollection in ASP.NET MVC
In this article, we will explore the use of FormCollection in an ASP.NET MVC application. Before proceeding, we recommend reviewing our previous article, where we discussed Business Objects as Models in ASP.NET MVC. We will continue working with the same example used in that article. Here, we will create a view that allows users to insert a new employee into the Employee database table using the FormCollection class provided by the ASP.NET MVC framework.
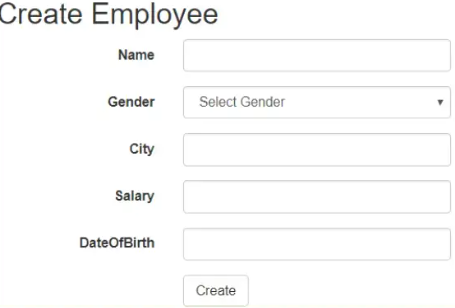
Creating a view to inserting data using FormCollection in MVCOur goal is to create a view, as shown below, for adding a new employee.
Creating the Create Action Method:
Add the following "Create" action method to the EmployeeController class. This method is decorated with the [HttpGet] attribute, ensuring that it responds exclusively to GET requests.
[HttpGet]
public ActionResult Create()
{
    return View();
}
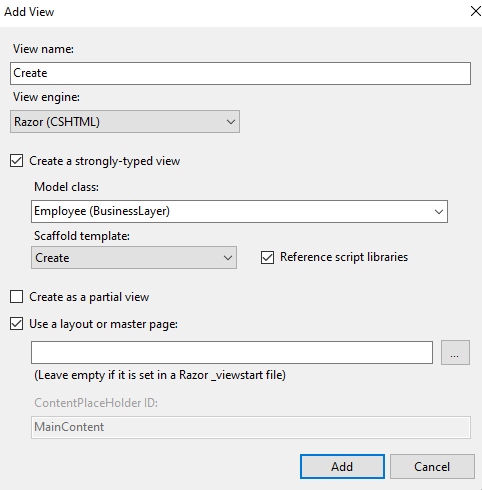
Next, let's add the "Create" view. To do this, right-click on the "Create" action method and select "Add View" from the context menu. Configure the necessary settings to generate the view.
View name = “Create”Template = “Create”
Model class = Employee (BusinessLayer)
Click on the “Add” button as shown below.
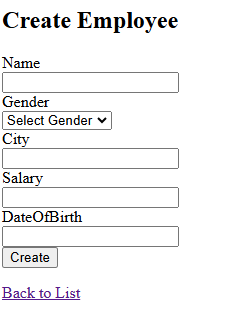
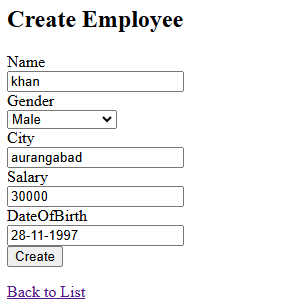
At this point, the Create.cshtml view will be added to the Employee folder. Run the application and navigate to the URL http://localhost:54094/Employee/Index. Click on the "Create New" link. It will navigate to the URL http://localhost:54094/Employee/Create and will display the following page.
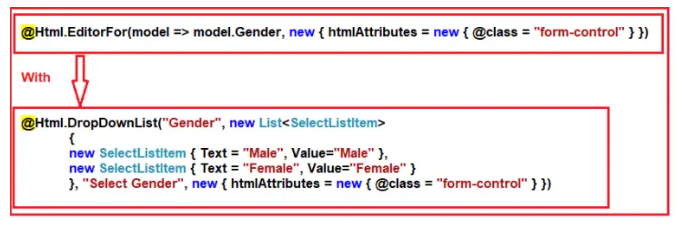
A form with input fields to enter a new employee's details is displayed. For the “Gender” field, using a dropdown list is more suitable than a text box. To implement this, replace the following line of code.
 After the changes, the complete code for the create view as shown below
 @model BusinessLayer.Employee
@{
    ViewBag.Title = "Create";
}
<h2> Employee</h2>
@using (Html.BeginForm())
{
    @Html.AntiForgeryToken()

    <div class="form-horizontal">

        @Html.ValidationSummary(true, "", new { @class = "text-danger" })
        <div class="form-group">
            @Html.LabelFor(model => model.Name, htmlAttributes: new { @class = "control-label col-md-2" })
            <div class="col-md-10">
                @Html.EditorFor(model => model.Name, new { htmlAttributes = new { @class = "form-control" } })
                @Html.ValidationMessageFor(model => model.Name, "", new { @class = "text-danger" })
            </div>
        </div>
        <div class="form-group">
            @Html.LabelFor(model => model.Gender, htmlAttributes: new { @class = "control-label col-md-2" })
            <div class="col-md-10">
                @Html.DropDownList("Gender", new List<SelectListItem>
                {
                new SelectListItem { Text = "Male", Value="Male" },
                new SelectListItem { Text = "Female", Value="Female" }
                }, "Select Gender", new { @class = "form-control" })
                @Html.ValidationMessageFor(model => model.Gender, "", new { @class = "text-danger" })
            </div>
        </div>
        <div class="form-group">
            @Html.LabelFor(model => model.City, htmlAttributes: new { @class = "control-label col-md-2" })
            <div class="col-md-10">
                @Html.EditorFor(model => model.City, new { htmlAttributes = new { @class = "form-control" } })
                @Html.ValidationMessageFor(model => model.City, "", new { @class = "text-danger" })
            </div>
        </div>
        <div class="form-group">
            @Html.LabelFor(model => model.Salary, htmlAttributes: new { @class = "control-label col-md-2" })
            <div class="col-md-10">
                @Html.EditorFor(model => model.Salary, new { htmlAttributes = new { @class = "form-control" } })
                @Html.ValidationMessageFor(model => model.Salary, "", new { @class = "text-danger" })
            </div>
        </div>
        <div class="form-group">
            @Html.LabelFor(model => model.DateOfBirth, htmlAttributes: new { @class = "control-label col-md-2" })
            <div class="col-md-10">
                @Html.EditorFor(model => model.DateOfBirth, new { htmlAttributes = new { @class = "form-control" } })
                @Html.ValidationMessageFor(model => model.DateOfBirth, "", new { @class = "text-danger" })
            </div>
        </div>
        <div class="form-group">
            <div class="col-md-offset-2 col-md-10">
                <input type="submit" value="Create" class="btn btn-default" />
            </div>
        </div>
    </div>
}
<div>
    @Html.ActionLink("Back to List", "Index")
</div>
<script src="~/Scripts/jquery-1.10.2.min.js"></script>
<script src="~/Scripts/jquery.validate.min.js"></script>
<script src="~/Scripts/jquery.validate.unobtrusive.min.js"></script>
Now, execute the application and observe that a dropdown list appears for “Gender.” However, if you press the “Create” button, you will encounter an error message stating – The resource cannot be found. This happens because there is no "Create" action method available to process HTTP POST requests.
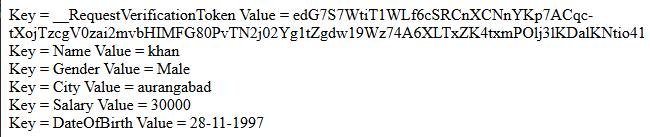
What is the FormCollection Class in ASP.NET MVC?In ASP.NET MVC, the FormCollection class automatically captures the submitted form data as key/value pairs within the controller's action method. These values can be retrieved using either their respective key names or index positions. The FormCollection can also be used to iterate through each key and its corresponding value sent to the server. Now, let's include the following Create POST method in the EmployeeController class.
[HttpPost]
public ActionResult Create(FormCollection formCollection)
{
    if (ModelState.IsValid)
    {
        foreach (string key in formCollection.AllKeys)
        {
            Response.Write("Key = " + key + "  ");
            Response.Write("Value = " + formCollection[key]);
            Response.Write("<br />");
        }
    }
    return View();
}
Now run the application and fill the view and click on the create button as shown below.
The output is as shown below.
Let’s create a stored procedure to insert the employee object in the Employee table
Create procedure spAddEmployee
  @Name nvarchar(50),
  @Gender nvarchar (10),
  @City nvarchar (50),
  @Salary decimal(18,2),
  @DateOfBirth DateTime
As
Begin
  Insert into Employee(Name, Gender, City, Salary, DateOfBirth)
  Values (@Name, @Gender, @City,@Salary, @DateOfBirth)
End
Add the following method to the EmployeeBusinessLayer.cs file.
//Add employee into the database. This method takes an argument of Employee type which contains the
//employee that is going to stored in the database
public void AddEmmployee(Employee employee)
{
    //Creating the connection string
    string connectionString = ConfigurationManager.ConnectionStrings["DBCS"].ConnectionString;
    //Establishing the connection to the database
    using (SqlConnection con = new SqlConnection(connectionString))
    {
        //Creating the command object by passing the stored procedure and connection object as argument
        //This stored procedure is used to store the employee in to the database
        SqlCommand cmd = new SqlCommand("spAddEmployee", con)
        {
            //Specifying the command as stored procedure
            CommandType = CommandType.StoredProcedure
        };
        //Creating SQL parameters because that stored procedure accept some input values
        SqlParameter paramName = new SqlParameter
        {
            //Storing the parameter name of the stored procedure into the SQL parameter
            //By using ParameterName property
            ParameterName = "@Name",
            //storing the parameter value into sql parameter by using Value ptoperty
            Value = employee.Name
        };
        //Adding that parameter into Command objects Parameter collection by using Add method
        //which will take the SQL parameter name as argument
        cmd.Parameters.Add(paramName);
        //Same for all other parameters (Gender, City, DateOfBirth )
        SqlParameter paramGender = new SqlParameter
        {
            ParameterName = "@Gender",
            Value = employee.Gender
        };
        cmd.Parameters.Add(paramGender);
        SqlParameter paramCity = new SqlParameter
        {
            ParameterName = "@City",
            Value = employee.City
        };
        cmd.Parameters.Add(paramCity);
        SqlParameter paramSalary = new SqlParameter
        {
            ParameterName = "@Salary",
            Value = employee.Salary
        };
        cmd.Parameters.Add(paramSalary);
        SqlParameter paramDateOfBirth = new SqlParameter
        {
            ParameterName = "@DateOfBirth",
            Value = employee.DateOfBirth
        };
        cmd.Parameters.Add(paramDateOfBirth);
        //Open the connection and execute the command on ExecuteNonQuery method
        con.Open();
        cmd.ExecuteNonQuery();
    }
}
To store the form data in the database table, update the Create (HTTP POST) action method in the EmployeeController.cs file as shown below.
//FormCollection will store the submitted form data automatically when the form is submitted
[HttpPost]
public ActionResult Create(FormCollection formCollection)
{
            Employee employee = new Employee();
            // Retrieve form data using form collection
            employee.Name = formCollection["Name"];
            employee.Gender = formCollection["Gender"];
            employee.City = formCollection["City"];
            employee.Salary =Convert.ToDecimal(formCollection["Salary"]);
            employee.DateOfBirth = Convert.ToDateTime(formCollection["DateOfBirth"]);
            EmployeeBusinessLayer employeeBusinessLayer = new EmployeeBusinessLayer();
            employeeBusinessLayer.AddEmmployee(employee);
            return RedirectToAction("Index");
}
Now Run the application and see everything is working as expected.
But do we really need to manually extract data from the FormCollection class and assign it to the properties of the employee object? The answer is no. This task is handled by the model binder in the ASP.NET MVC framework.
In the next article, we will explore Model Binders in ASP.NET MVC with practical examples.
In this article, I have explained how to utilize FormCollection in an ASP.NET MVC application with an example. I hope you found this discussion on FormCollection helpful and informative.