Working with Multiple Tables in ASP.NET MVC using Entity Framework
Working with Multiple Tables in ASP.NET MVC using Entity Framework
In this article, I will discuss how to work with multiple tables in an ASP.NET MVC application using Entity Framework. If you haven’t already, please check out our previous article, where we covered the ActionLink HTML Helper in an ASP.NET MVC application. By the end of this article, you will have a clear understanding of how to handle multiple tables in an ASP.NET MVC application using Entity Framework.
Database tables used in this demo:
We are going to work with the below two tables i.e. Department and Employee.
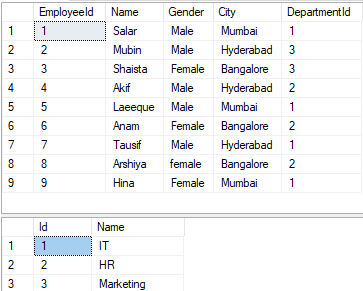
Please use the below SQL script to create and populate Department and Employee tables with the required test data.
-- Create Department Table
Create table Department
(
  Id int primary key identity,
  Name nvarchar(50)
)
GO
-- Insert some test data into Department table
Insert into Department values('IT')
Insert into Department values('HR')
Insert into Department values('Marketing')
GO
<br>-- First Drop the Existing Employee table<br>DROP Table Employee;<br>
-- Create Employee Table
Create table Employee
(
  EmployeeId int Primary Key Identity(1,1),
  Name nvarchar(50),
  Gender nvarchar(10),
  City nvarchar(50),
  DepartmentId int
)
GO
-- Add Foreign Key into Employee Table Reference to the Department Table
Alter table Employee
add foreign key (DepartmentId)
references Department(Id)
GO
-- Insert Some Test data into Employee Table
Insert into Employee values('Salar','Male','Mumbai',1)
Insert into Employee values('Mubin','Male','Hyderabad',3)
Insert into Employee values('Shaista','Female','Bangalore',3)
Insert into Employee values('Akif','Male','Hyderabad',2)
Insert into Employee values('Laeeque','Male','Mumbai',1)
Insert into Employee values('Anam','Female','Bangalore',2)
Insert into Employee values('Tausif','Male','Hyderabad',1)
Insert into Employee values('Arshiya','female','Bangalore',2)
Insert into Employee values('Hina','Female','Mumbai',1)
GO
select *from Employee
Select *from Department
Following is our business requirement.
- We need to retrieve and display all departments from the Department table. Each department name should be presented as a clickable hyperlink. This will serve as our department listing page.
- On clicking the department name link, all the employees in that particular department should be displayed. The employee names also here going to be rendered as hyperlinks. This is going to be our employee list page.
- When the user clicks on the employee name link the full details of that employee should be displayed in the browser. This is going to be our employee details page.
- A link should also be provided on the employee full details page to navigate back to the Employee List page. Along the same lines, a link should also be provided on the employee list page to navigate back to the Departments’s list page.
Generating hyperlinks using Action Link HTML helper
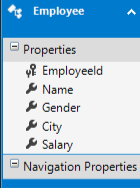
To implement the above example first we need to update the EmployeeDataModel.edmx file.
Update the EDMX file
Double click on the EmployeeDataModel.edmx file which is in the Models folder. Once you click on the edmx file the following screen will open.
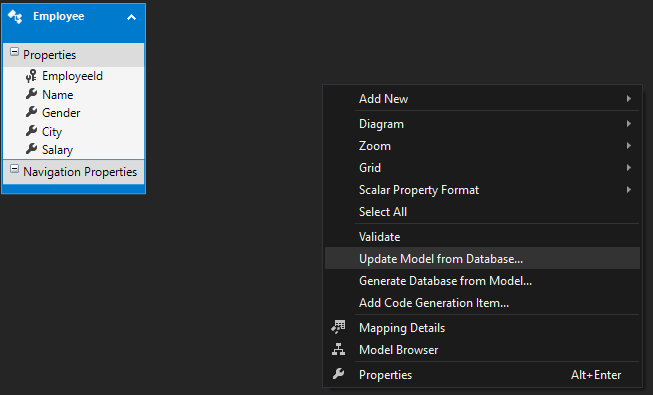
Right-click anywhere within the `.edmx` file, then select the Update Model from Database option, as illustrated in the image below.
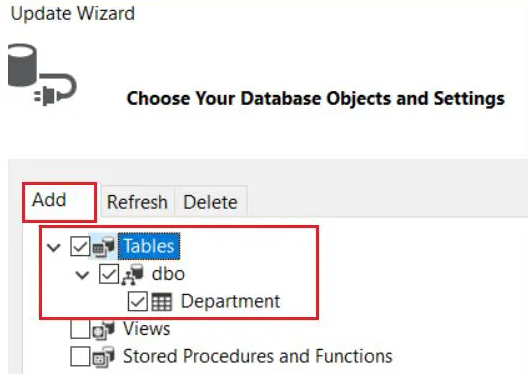
Next, click on the Add button and choose the Department table, as displayed in the image below.
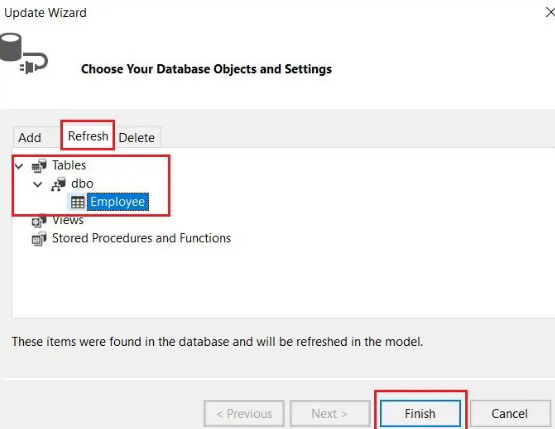
Then, click on the Refresh button, select the Employee table, and press the Finish button, as shown in the image below.
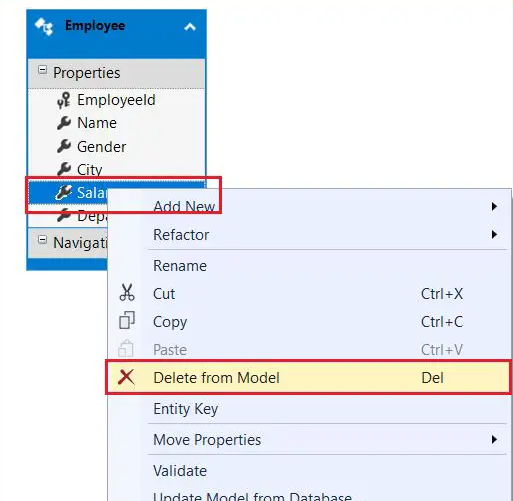
After clicking the Finish button, an error will appear stating that the Salary property is not mapped. To resolve this, navigate to the Employee model in the EDMX file, select the Salary property, right-click on it, and choose Delete from Model, as shown in the image below.
That's all! Save the EDMX file and build the solution. Now, let's review the files that Entity Framework has generated and modified.
Department.cs (This file is added by Entity Framework)
namespace CRUD_OperationsInMVC.Models
{
    using System;
    using System.Collections.Generic;

    public partial class Department
    {
        [System.Diagnostics.CodeAnalysis.SuppressMessage("Microsoft.Usage", "CA2214:DoNotCallOverridableMethodsInConstructors")]
        public Department()
        {
            this.Employees = new HashSet<employee>();
        }

        public int Id { get; set; }
        public string Name { get; set; }

        [System.Diagnostics.CodeAnalysis.SuppressMessage("Microsoft.Usage", "CA2227:CollectionPropertiesShouldBeReadOnly")]
        public virtual ICollection<employee> Employees { get; set; }
    }
}
Employee.cs (This file is modified by Entity Framework)
namespace CRUD_OperationsInMVC.Models
{
    using System;
    using System.Collections.Generic;

    public partial class Employee
    {
        public int EmployeeId { get; set; }
        public string Name { get; set; }
        public string Gender { get; set; }
        public string City { get; set; }
        public Nullable<int> DepartmentId { get; set; }

        public virtual Department Department { get; set; }
    }
}
EmployeeDataModel.Context.cs (This file is modified by Entity framework)
namespace CRUD_OperationsInMVC.Models
{
    using System;
    using System.Data.Entity;
    using System.Data.Entity.Infrastructure;

    public partial class EmployeeDBContext : DbContext
    {
        public EmployeeDBContext()
            : base("name=EmployeeDBContext")
        {
        }

        protected override void OnModelCreating(DbModelBuilder modelBuilder)
        {
            throw new UnintentionalCodeFirstException();
        }

        public virtual DbSet<employee> Employees { get; set; }
        public virtual DbSet<department> Departments { get; set; }
    }
}
These are the changes done by entity framework.
Add Department Controller
Right click on the “Controllers” folder and add a MVC5 Empty Controller with the name DepartmentController and then Copy and paste the following code into it.
namespace CRUD_OperationsInMVC.Controllers
{
    public class DepartmentController : Controller
    {
        public ActionResult Index()
        {
            EmployeeDBContext dbContext = new EmployeeDBContext();
            List<department> listDepartments = dbContext.Departments.ToList();
            return View(listDepartments);
        }
    }
}
Right-click on the Index() action method in DepartmentController class and select “Add View” from the context menu. Set all the default values as it is. Copy and paste the following code in Index.cshtml view file in Department folder.
Right-click on the Index() action method in the DepartmentController class and choose "Add View" from the context menu. Keep all the default values unchanged. Then, copy and paste the following code into the Index.cshtml view file inside the Department folder.
@using CRUD_OperationsInMVC.Models;
@model IEnumerable<department>
<div style="font-family:Arial">
    @{
        ViewBag.Title = "Departments List";
    }
    <h2>Departments List</h2>
    <ul>
        @foreach (Department department in @Model)
        {
            <li>@Html.ActionLink(department.Name, "Index", "Employee", new { departmentId = department.Id }, null)</li>
        }
    </ul>
</div>
In the code above, we utilize the **ActionLink** HTML helper extension, which accepts five parameters.
public static MvcHtmlString ActionLink(this HtmlHelper htmlHelper, string linkText, string actionName, string controllerName, object routeValues, object htmlAttributes);
Modify Employee Controller:Update the Index() action method in the EmployeeController class to accept the departmentId parameter. Utilize this parameter to filter the employee list. After applying these modifications, the EmployeeController will look as follows.
namespace CRUD_OperationsInMVC.Controllers
{
    public class EmployeeController : Controller
    {
        public ActionResult Index(int departmentId)
        {
            EmployeeDBContext dbContext = new EmployeeDBContext();
            List<employee> employees = dbContext.Employees.Where(emp => emp.DepartmentId == departmentId).ToList();
            return View(employees);
        }
        public ActionResult Details(int id)
        {
            EmployeeDBContext dbContext = new EmployeeDBContext();
            Employee employee = dbContext.Employees.FirstOrDefault(x => x.EmployeeId == id);
            return View(employee);
        }
    }
}
Copy and paste the following code into "Index.cshtml", located in the "Employee" folder inside the "Views" folder. This modification allows us to generate an action link that redirects the user to a different controller action method.
@model IEnumerable<crud_operationsinmvc.models.employee>
@using CRUD_OperationsInMVC.Models;
<div style="font-family:Arial">
    @{
        ViewBag.Title = "Employee List";
    }
    <h2>Employee List</h2>
    <ul>
        @foreach (Employee employee in @Model)
        {
            <li>@Html.ActionLink(employee.Name, "Details", new { id = employee.EmployeeId })</li>
        }
    </ul>
    @Html.ActionLink("Back to Department List", "Index", "Department")
</div>
Here, we are just removing the Salary property.
@model CRUD_OperationsInMVC.Models.Employee
@{
    ViewBag.Title = "Employee Details";
}
<h2>Employee Details</h2>
<table style="font-family:Arial">
    <tr>
        <td>Employee ID:</td>
        <td>@Model.EmployeeId </td>
    </tr>
    <tr>
        <td>Name:</td>
        <td>@Model.Name</td>
    </tr>
    <tr>
        <td>Gender:</td>
        <td>@Model.Gender</td>
    </tr>
    <tr>
        <td>City:</td>
        <td>@Model.City</td>
    </tr>
</table>
<p>
   @Html.ActionLink("Back to Employee List", "Index", new { departmentId = @Model.DepartmentId })
</p>
Change the RouteConfig file as shown below where we provide the default Route as Index Action Method of Department Controller.
namespace CRUD_OperationsInMVC
{
    public class RouteConfig
    {
        public static void RegisterRoutes(RouteCollection routes)
        {
            routes.IgnoreRoute("{resource}.axd/{*pathInfo}");
            routes.MapRoute(
                name: "Default",
                url: "{controller}/{action}/{id}",
                defaults: new { controller = "Department", action = "Index", id = UrlParameter.Optional }
            );
        }
    }
}
That’s it we have done with our implementation. Now run the application and see everything is working as expected or not.
In the upcoming article, I will cover how to use a Business Object as a Model in an ASP.NET MVC application. In this article, I have explained how to work with multiple tables in an ASP.NET MVC application using Entity Framework, along with an example. I hope this article meets your requirements. I would love to hear your thoughts—feel free to share your feedback, questions, or comments.